If you've ever tried to explain a software feature with a wall of text or a 47-slide deck, you already know the problem. People don't read. They watch.
According to Wyzowl's 2026 Video Marketing Report, 91% of businesses now use video as a marketing tool - a record high. And according to industry research, 83% of people prefer watching video over text or audio when learning something new.
Software tutorial videos sit at the intersection of this trend. Whether you're onboarding new users, reducing support tickets, or building a YouTube audience around your product, a well-made tutorial video can do more than a hundred help docs.
This guide walks you through the entire process - from planning to publishing - with real data, practical tools, and the specific techniques that make software tutorials different from every other kind of video.
The chart below shows just how quickly businesses have adopted video as a core tool.
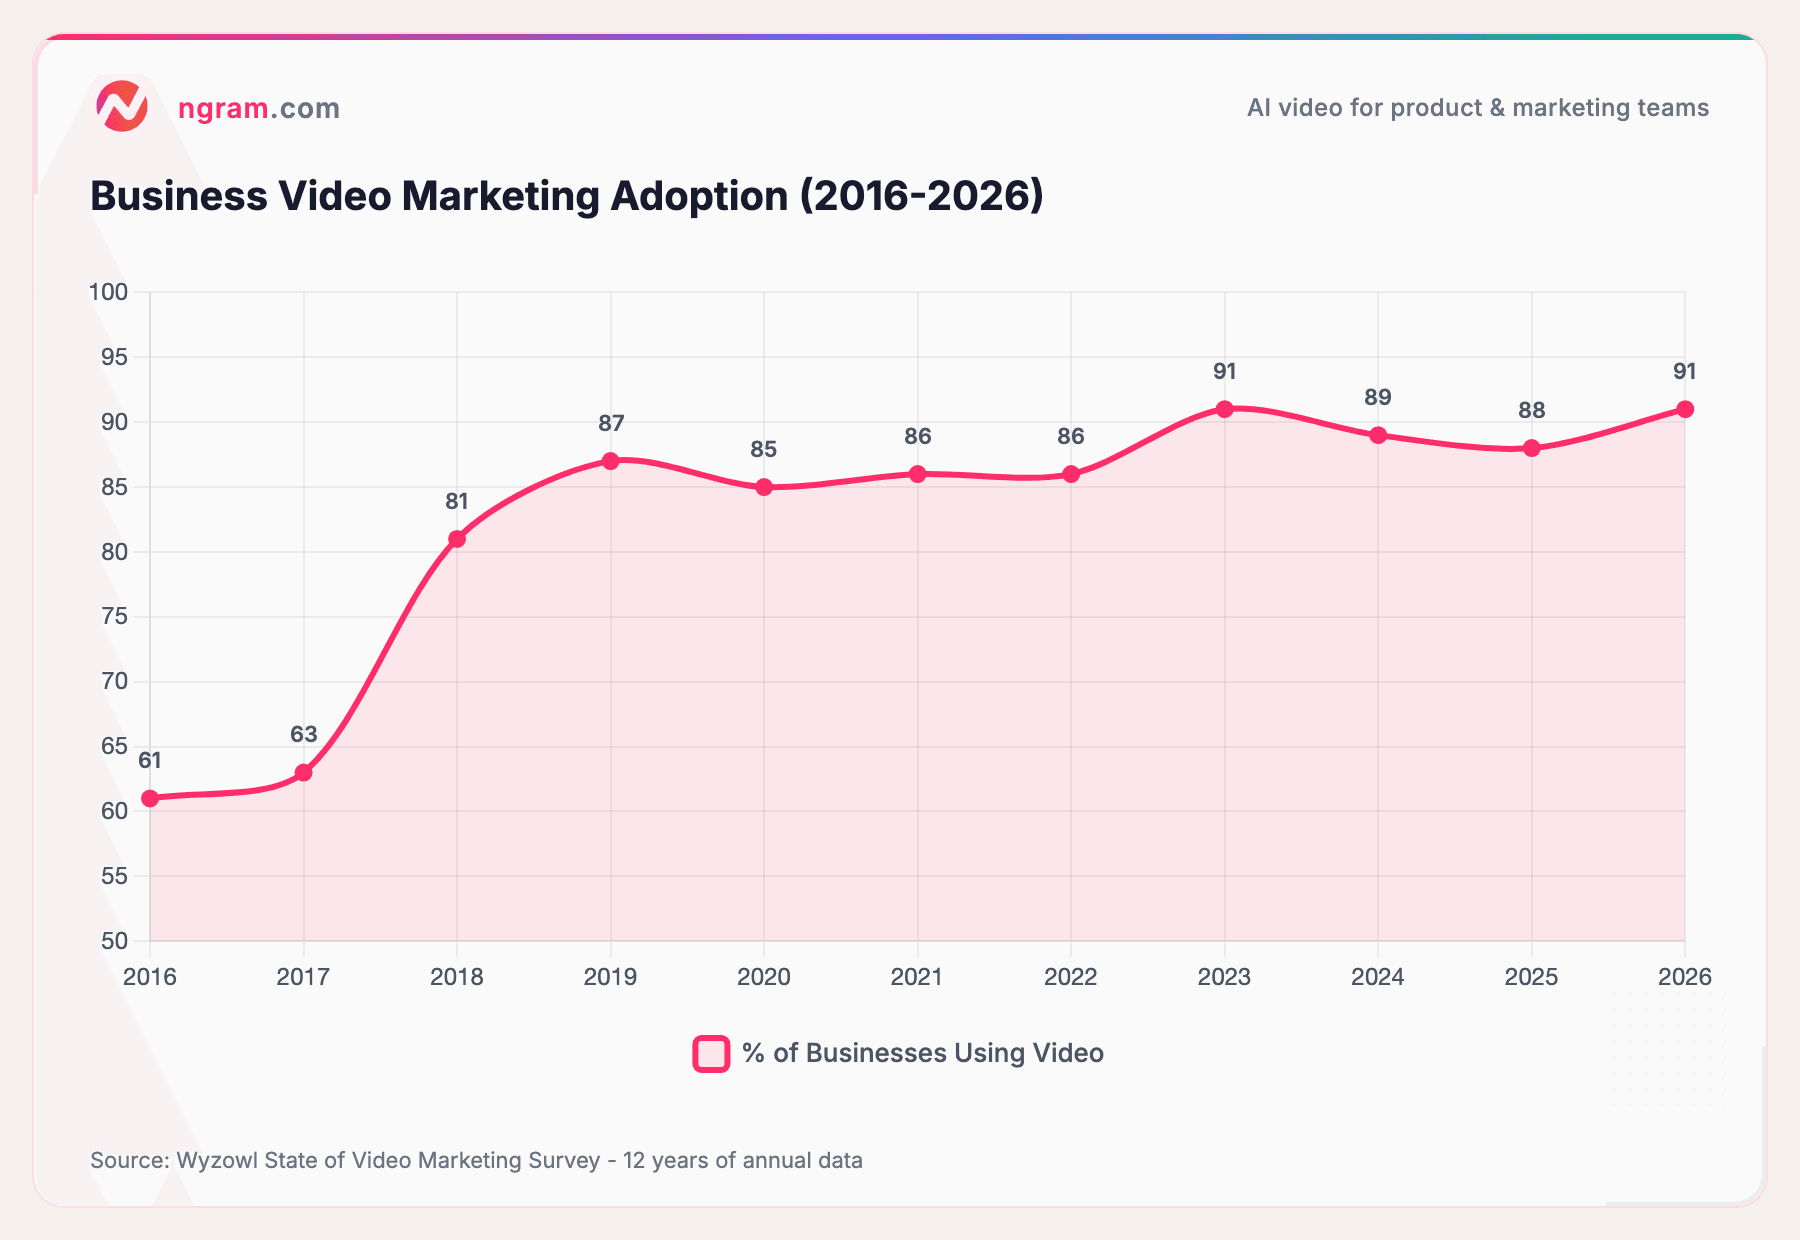
Source: Wyzowl State of Video Marketing Survey - 12 years of annual data
From 61% in 2016 to 91% in 2026, video adoption has grown steadily. Screen-recorded content now accounts for 19% of all marketing videos created, making it the third most popular format after live action and animation.
What Is a Software Tutorial Video?
A software tutorial video is a screen-recorded walkthrough that teaches viewers how to use a specific application, feature, or workflow. Unlike a product demo (which sells) or an explainer video (which introduces), a tutorial video teaches.
Think of it as the difference between a movie trailer and a cooking class. One sells the idea. The other shows you exactly how to do it.
Software tutorials have unique requirements that set them apart from other video types:
- Screen clarity matters more than camera quality. Your viewer needs to read UI elements, follow cursor movements, and see exactly where to click.
- Pacing must match the task. Too fast and viewers get lost. Too slow and they skip ahead.
- Audio quality is non-negotiable. According to UserGuiding, bad audio is more distracting than low-quality video. Your voice carries the instruction.
- Structure follows the software's logic. You can't freestyle a tutorial the way you might a vlog. Each step must build on the last.
Why Software Tutorial Videos Drive Real Business Results
Let's talk numbers. The business case for software tutorial videos goes well beyond "people like video."
Retention: Video Crushes Text
The difference in how people retain information from video versus text is staggering.
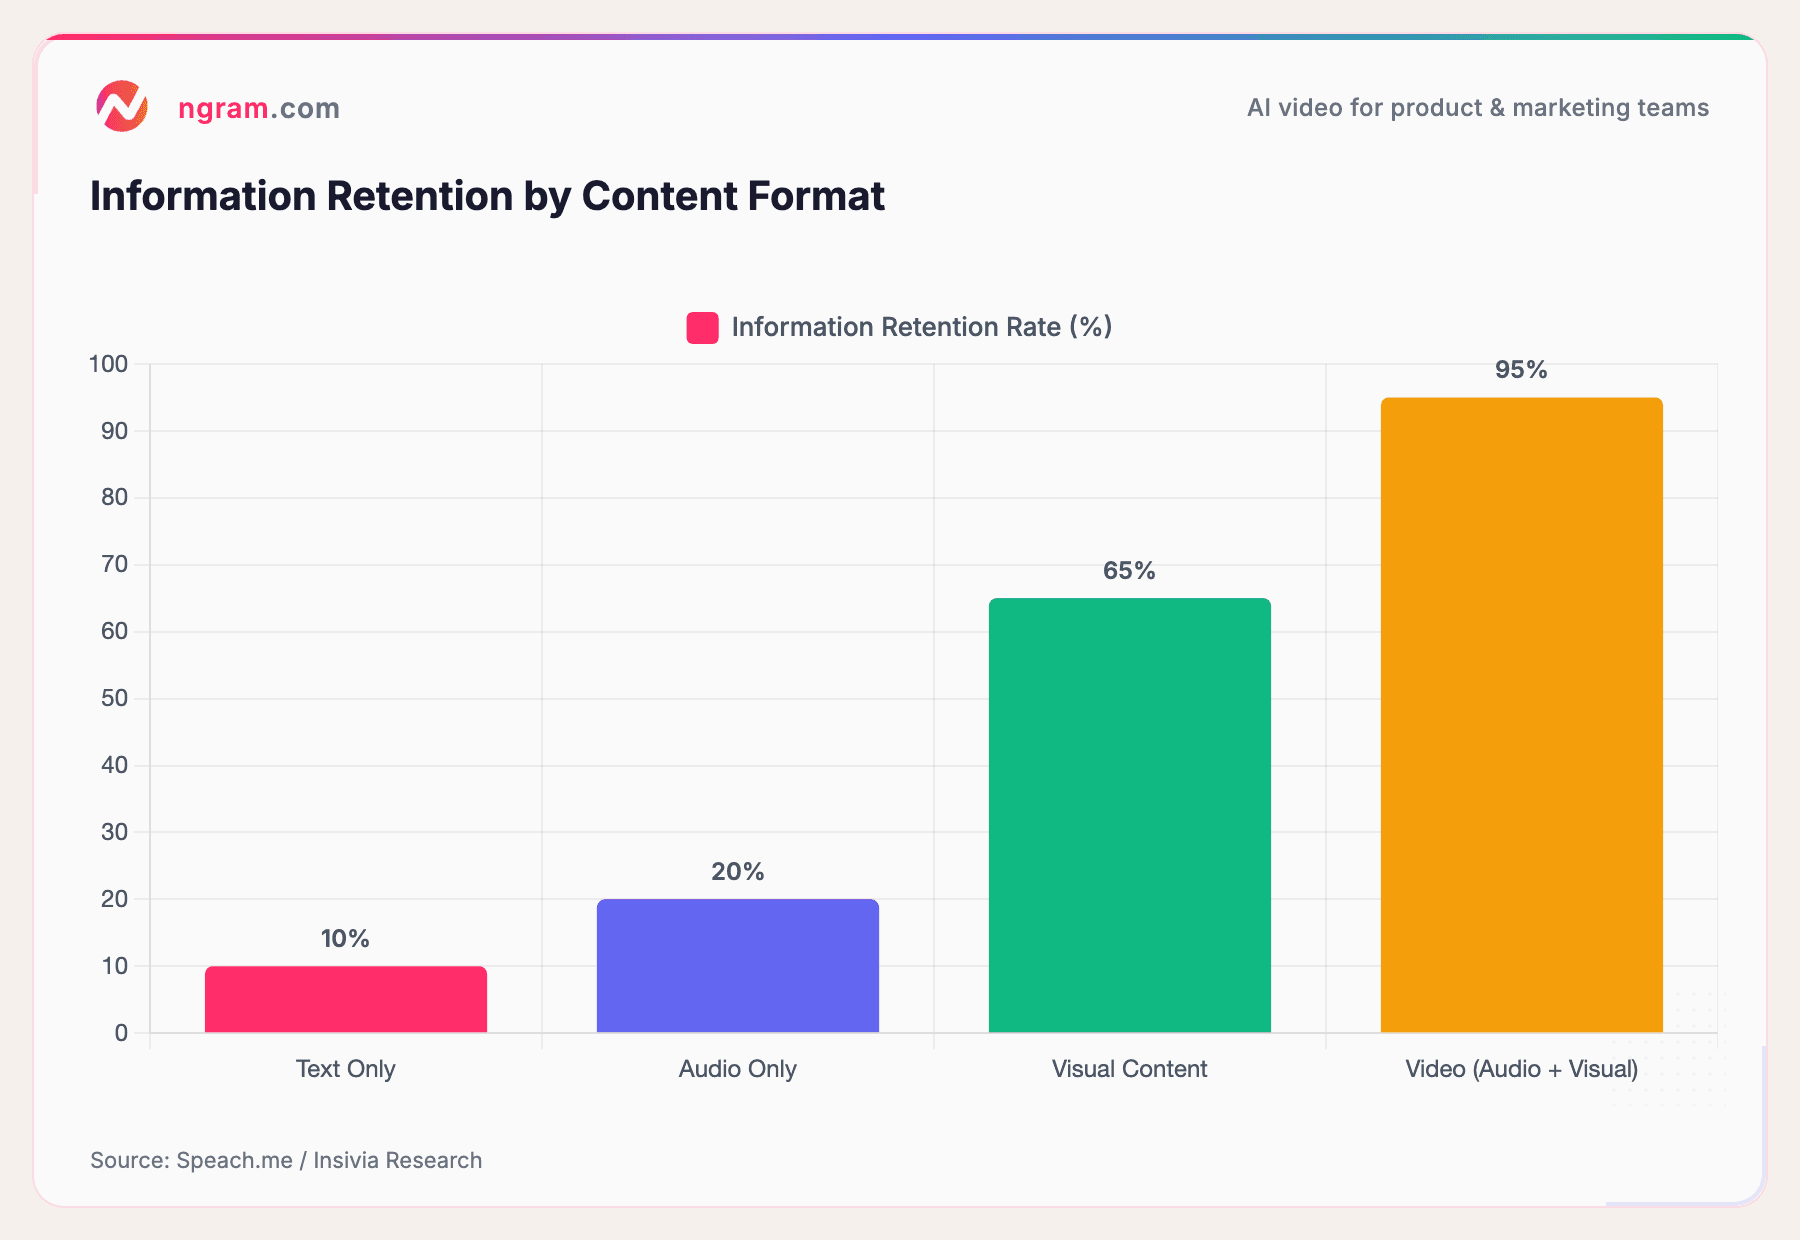
Source: Speach.me / Insivia Research
Viewers retain 95% of a message from video compared to just 10% when reading the same information as text. That's not a marginal improvement - it's an order of magnitude difference. For software tutorials specifically, this means users actually remember the steps they watched, instead of re-reading help docs every time.
Support Tickets Drop Dramatically
One of the most concrete ROI metrics for software tutorial videos is support ticket reduction.
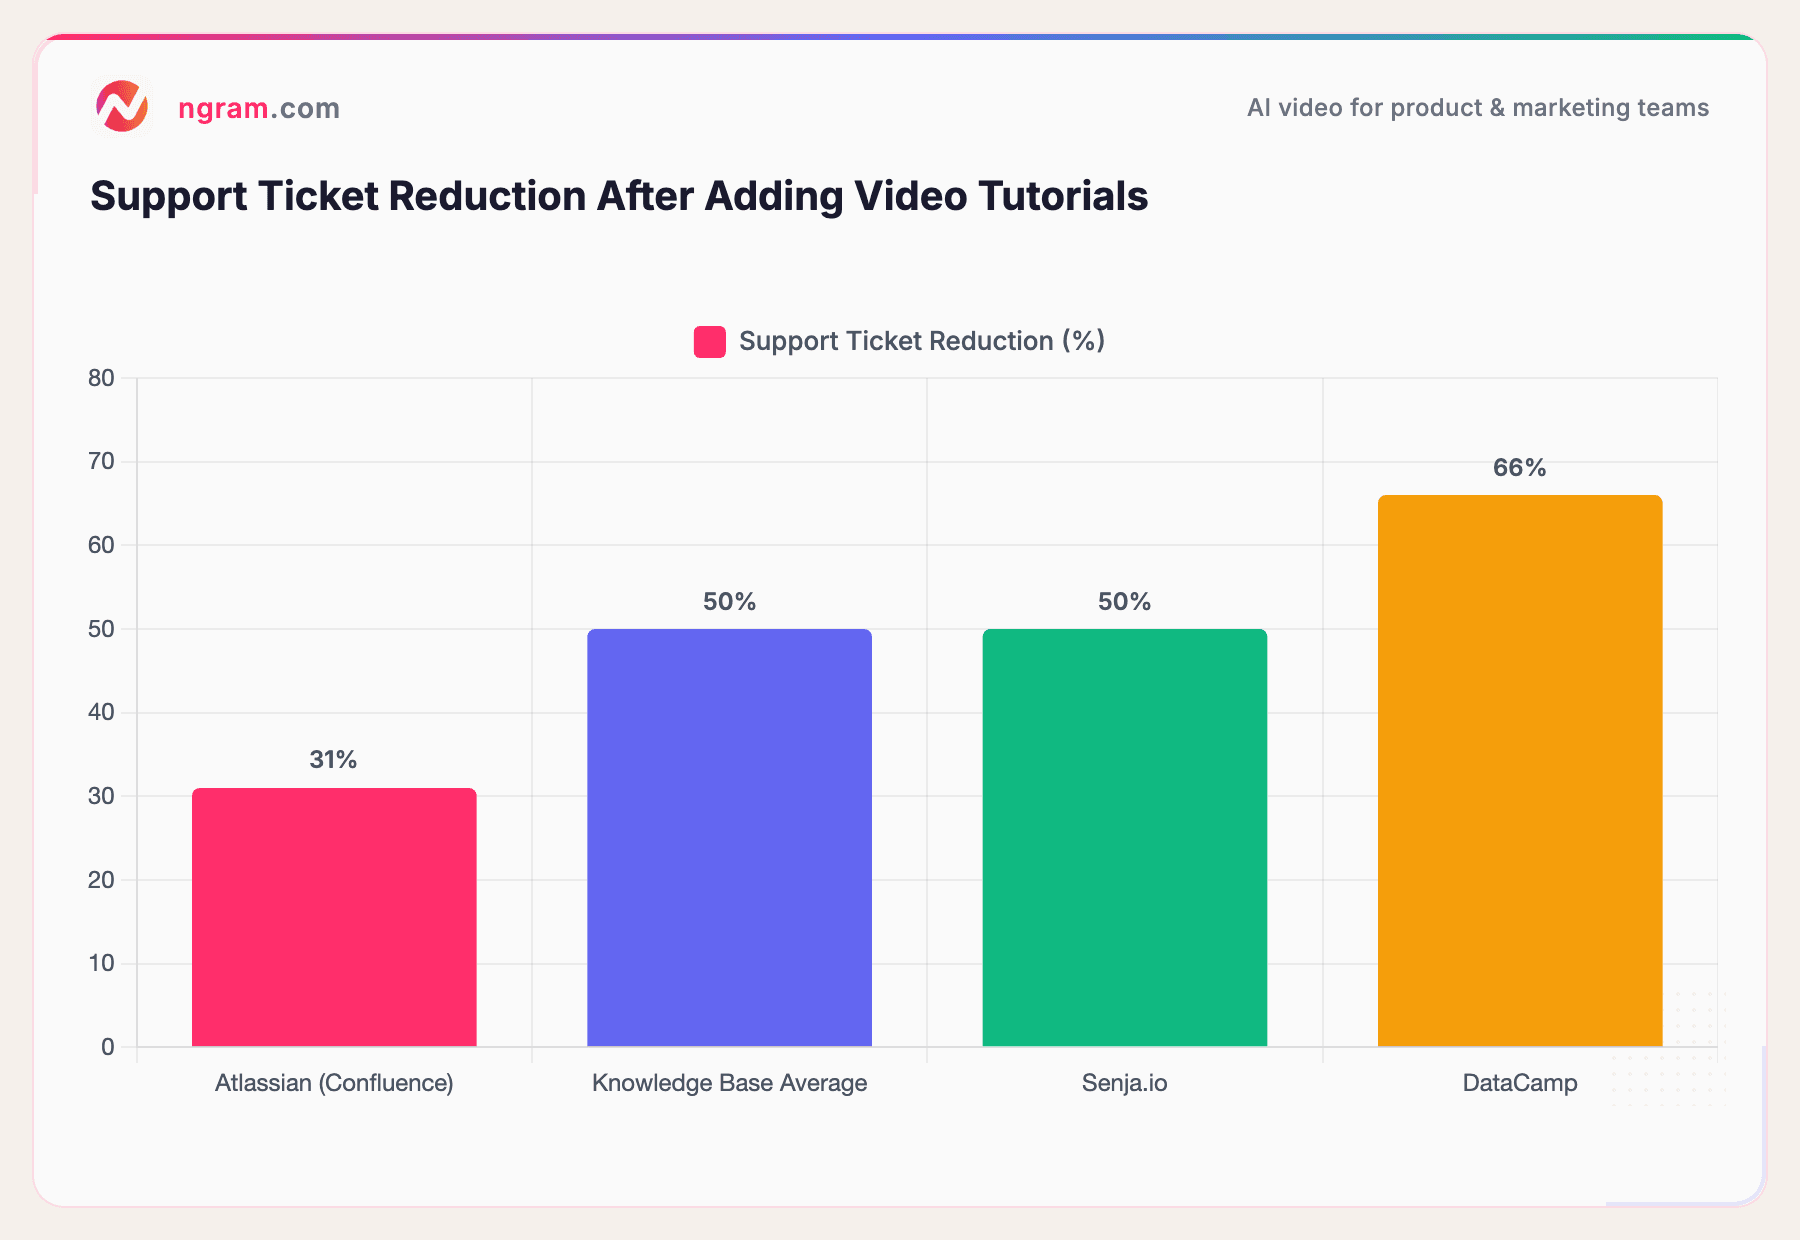
Sources: StorytoDoc, Document360
Senja.io cut their support tickets by 50% after adding video tutorials. DataCamp achieved a 66% reduction. Even Atlassian saw a 31% drop with Confluence-based video documentation. The pattern is clear: when users can watch a quick tutorial instead of filing a ticket, most of them will.
Industry data also shows that customers who submit video-based support requests get resolved 30% faster than text-only tickets.
The Broader Business Case
- Wyzowl reports 93% of video marketers say video increased user understanding of their product
- 85% say video helped generate leads
- 82% say video marketing gave them a positive ROI
- Users are 3x more likely to watch a YouTube tutorial than read written instructions (Google research)
Essential Equipment and Tools You Need
Here's the good news: you don't need a studio to make a great software tutorial. The bar for entry is lower than most people think.
Hardware
Microphone (most important purchase)
Bad audio kills tutorial videos faster than anything else. Your laptop's built-in mic picks up keyboard clatter, fan noise, and room echo. A USB condenser microphone ($50-$150) is the single best investment you can make.
Popular options: Blue Yeti, Audio-Technica AT2020 USB, Rode NT-USB Mini.
Monitor
If you're recording at 1920x1080, a larger monitor (24"+) gives you more workspace and makes your UI elements more readable in the final video. Techstructional recommends recording at 4K if your setup supports it - this gives you room to crop and zoom in post-production without losing clarity.
Webcam (optional)
A picture-in-picture webcam overlay adds a personal touch. It's not required for software tutorials, but it can increase engagement during intro and outro segments.
Software
Screen recording tools:
- OBS Studio (free, powerful, steep learning curve)
- Camtasia (all-in-one recording + editing, $300)
- Loom (quick recordings, limited editing)
- ScreenFlow (Mac-only, solid editor)
AI-powered alternatives:
Tools like ngram take a different approach. Instead of just recording and editing, they help you turn raw screen recordings into polished tutorials with automatic smart zoom, callouts, captions, and pacing adjustments - cutting the editing time significantly.
What It Costs
Here's a reality check on production costs.
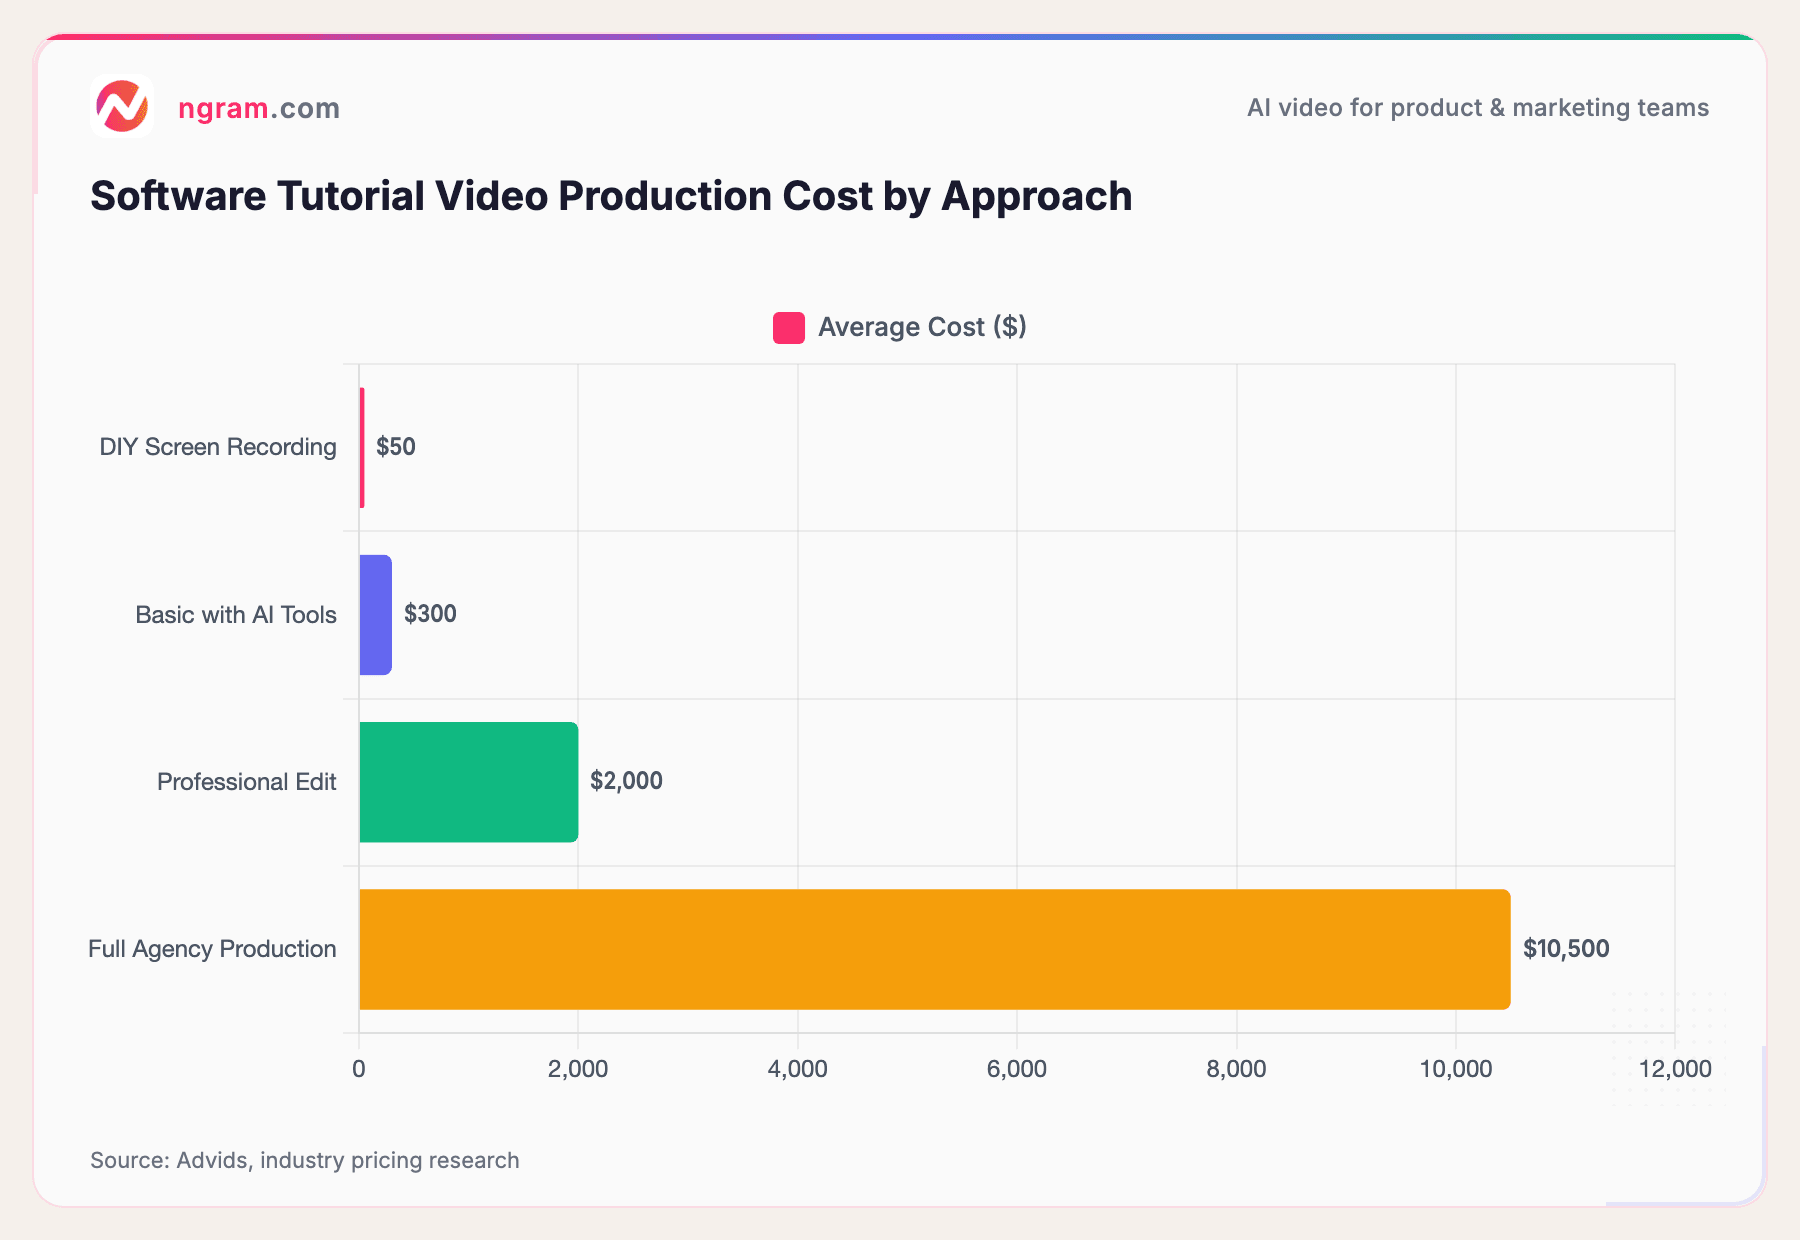
Source: Advids, industry pricing research
DIY screen recordings cost almost nothing - just your time and a free tool like OBS. With AI-powered tools, you can get polished results for a few hundred dollars. Professional editing runs $1,500-$2,500 per video, while full agency production can hit $5,000-$16,000. According to Advids, the average 60-second software product video costs $2,990.
The good news: AI tools have dropped costs by roughly 22% compared to 2024, according to industry surveys.
How to Make a Software Tutorial Video: 8 Steps
Step 1: Define Your Audience and Learning Objective
Before you touch any recording software, answer two questions:
- Who is watching? A developer learning an API is different from a marketing manager learning a dashboard. Their technical vocabulary, patience level, and what they consider "obvious" are completely different.
- What should they be able to do after watching? One specific outcome. Not "understand the platform" but "create their first automated workflow" or "export a report in CSV format."
Techstructional's guide uses the ADDIE instructional design framework here: the planning phase should answer "what is nothing important if everything is important?" In other words, cut scope ruthlessly. One video, one objective.
Step 2: Plan Your Content and Write a Script
A script doesn't have to be word-for-word. But you need a plan. Here's a practical format:
Two-column storyboard:
| What's on screen | What you're saying |
|---|---|
| Dashboard home view | "First, navigate to the main dashboard. You'll see three tabs at the top." |
| Click on Settings tab | "Click Settings. This is where we'll configure the integration." |
| Zoom on API key field | "Paste your API key here. If you don't have one yet, I'll show you where to generate it in a moment." |
This approach from UserGuiding keeps your recording focused. You know exactly what to show and what to say at each step, which dramatically reduces editing time.
Script tips for software tutorials:
- Explain the "why" before the "how." Telling viewers why a setting matters keeps them engaged.
- Use signposting: "There are three things we need to configure. First..." This gives viewers a mental map.
- Keep sentences short. You'll stumble less during recording, and viewers will follow more easily.
Step 3: Set Up Your Recording Environment
Clean your screen:
- Close every app that isn't part of the tutorial
- Turn off all notifications (Slack, email, OS notifications, calendar alerts)
- Hide your bookmarks bar
- Set your browser zoom to 100% (or 125% for better readability)
- Use a clean desktop wallpaper
Prepare the software you're recording:
- Reset to a state that matches what a new user would see
- Pre-load any sample data you'll need
- Test the entire workflow once before recording so you don't hit unexpected errors
Audio environment:
- Record in a quiet space. A closet with clothes actually works well - the fabric absorbs echo.
- Position your mic 6-8 inches from your mouth, slightly off-axis (to reduce plosives)
- Do a 30-second test recording and listen back. Adjust if you hear echo, hum, or background noise.
Step 4: Record Your Screen and Audio
Here's where software tutorials diverge from other video types.
Record audio separately from screen (when possible). This is the pro move that most beginner guides skip. Recording audio and screen as separate tracks gives you much more flexibility in editing. You can:
- Fix audio mistakes without re-recording the screen
- Adjust pacing after the fact
- Add pauses or speed up sections independently
If you're using a screen recording editor, look for one that supports separate audio tracks.
During recording:
- Move your cursor slowly and deliberately. What feels normal to you looks fast on screen.
- Pause briefly (2-3 seconds) before and after each major action. This gives editors natural cut points.
- If you make a mistake, don't stop. Pause for 3 seconds, then repeat the step. You'll edit out the mistake later.
- Narrate what you're doing as you do it: "I'm clicking the Create button in the top right corner."
Resolution: Record at the highest resolution your system handles smoothly. 1920x1080 is the standard, but 4K gives you room for zoom-ins during editing.
Step 5: Edit for Clarity and Flow
Editing is where a rough recording becomes a tutorial people actually watch.
The essential edits:
- Cut dead air. Remove any pauses longer than 2 seconds where nothing is happening.
- Trim mistakes. Delete the fumbles and re-starts you left in during recording.
- Tighten pacing. The ideal tutorial video is between 2-10 minutes. According to UserGuiding, anything longer should be broken into a series.
- Smooth transitions. Add simple crossfades between major steps so the video doesn't jump abruptly.
Want to skip the editing grind? ngram turns raw screen recordings into polished tutorials automatically - smart zoom, cuts, callouts, and pacing all handled for you. Try it free
Step 6: Add Callouts, Zoom, and Visual Cues
This step is what separates amateur tutorials from professional ones.
Zoom into key areas. When you click a small button or fill in a specific field, zoom the view so it fills the screen. Viewers on mobile phones or smaller monitors will thank you.
Add callouts and annotations. Use arrows, highlights, or text labels to draw attention to the exact part of the UI you're discussing. This is especially important for dense interfaces with many buttons and menus.
Cursor emphasis. Make your cursor larger or add a highlight ring around it. On a busy screen, viewers often lose track of where the cursor is. Tools with built-in cursor emphasis features handle this automatically.
Step labels. Add a persistent "Step 1 of 5" label so viewers know where they are in the process. This reduces abandonment because people can see progress.
Step 7: Add Captions, Intro, and Branding
Captions are mandatory, not optional. According to research from Wyzowl, a significant portion of viewers watch without sound, especially on mobile. Auto-generated captions have gotten remarkably accurate, but always review them for technical terms your software uses. "API endpoint" shouldn't become "a pie endpoint."
Intro (keep it under 10 seconds):
- Who you are
- What they'll learn
- How long it will take
That's it. Don't spend 30 seconds on a branded intro animation. According to Social Insider, 50% of viewers drop off within the first 15 seconds. Get to the content fast.
Branding:
- Add your logo as a small, non-distracting watermark (lower-right corner works well)
- Use consistent fonts and colors for any text overlays
- Add a brief outro with a call to action: subscribe, visit your docs, try the product
Step 8: Export, Publish, and Distribute
Export settings:
- Format: MP4 (H.264 codec) - universally compatible
- Resolution: 1080p minimum (4K if the platform supports it)
- Frame rate: 30fps for screen recordings (60fps is overkill for UI walkthroughs)
Where to publish:
- YouTube - The largest search engine for how-to content. 86% of US viewers say they often learn new things from YouTube (according to Google research). Optimize your title, description, and tags for searchability.
- Your help center or knowledge base - Embed tutorials directly in relevant help articles. This is where the support ticket reduction happens.
- In-app - If you can embed video in your product's onboarding flow or feature announcements, do it. Contextual tutorials have the highest completion rates.
- Social media - Cut your tutorial into shorter clips (30-60 seconds) for LinkedIn, Twitter, and Instagram. Short educational videos get 49% more shares than other content types, according to recent video marketing research.
SEO for YouTube:
- Include your target keyword in the title (e.g., "How to Set Up Automated Workflows in [Software Name]")
- Write a detailed description (300+ words) with timestamps for each step
- Add chapters using timestamps in the description
- Create a custom thumbnail showing the end result
7 Pro Tips for Better Software Tutorials
- Show the end result first. Start with a 10-second preview of what the finished workflow or feature looks like. This motivates viewers to stick around.
- Talk like you're helping a friend. Drop the corporate voice. "Click the gear icon in the top right" is better than "Navigate to the settings interface via the configuration control element."
- Use real data in demos. Don't show empty dashboards or placeholder text. Fill your demo environment with realistic data so viewers can see what the software actually looks like in use.
- Record at 1.0x speed, edit to feel like 1.2x. Record at normal pace, then tighten edits to remove micro-pauses. This feels natural but keeps energy high. Don't just speed up the whole video - that makes audio sound unnatural.
- Break complex features into a series. A 25-minute tutorial is a documentation project. Five 5-minute tutorials is a content library that people can search, share, and bookmark.
- Add timestamps and chapters. This is non-negotiable for YouTube. It also helps users who come back to re-watch a specific step without scrubbing through the whole video.
- Update your tutorials when the UI changes. Nothing destroys trust faster than a tutorial that shows buttons and menus that no longer exist. Set a quarterly review cadence for your most-viewed tutorials.
How to Measure Tutorial Video Performance
You've published your tutorial. Now what? Track these metrics to know if it's working.
Watch time and completion rate
Completion rates of 50-70% are considered good. For tutorial videos specifically, aim for the higher end - if people are dropping off at 40%, your pacing might be off or you're covering too much in one video.
Support ticket volume
The most direct metric for software tutorials. Track tickets related to the feature you covered before and after publishing the tutorial. A well-developed video knowledge base can reduce tickets by 40-60%.
Search rankings and traffic
If you're publishing on YouTube, track your position for target keywords. YouTube is the second-largest search engine, and how-to queries are its bread and butter. YouTube has 2.85 billion monthly active users - your tutorial video has a massive potential audience.
User activation and feature adoption
For product teams: are more users completing the workflow after watching the tutorial? Track in-app analytics alongside video views to connect the dots.
Engagement signals
Likes, comments, and shares indicate whether your tutorial resonated. Tutorial videos get 53% higher average watch time than promotional videos, so they're naturally strong engagement drivers.
Common Mistakes to Avoid
Recording without a script. Winging it leads to rambling, backtracking, and "um" every other sentence. Even a bullet-point outline dramatically improves your delivery.
Trying to cover everything in one video. The "complete guide to our entire platform" video is a 45-minute monster nobody watches. Break it up.
Neglecting audio. 52% of people watch at least two instructional videos weekly, according to industry surveys. If your audio is bad, they'll watch someone else's tutorial instead of yours.
Skipping captions. Accessibility aside, captions boost comprehension and let viewers follow along in noisy environments. There's no excuse to skip them in 2026.
Not showing the "why." Clicking through menus is not a tutorial. A tutorial explains why each step matters, what happens if you skip it, and what to do if something goes wrong.
Forgetting to update. Software changes. If your tutorial shows a UI from two versions ago, viewers lose trust immediately. Set reminders to review and re-record when major updates ship.
Frequently Asked Questions
How long should a software tutorial video be?
Most effective tutorial videos are between 2-10 minutes. According to UserGuiding, this range is optimal for maintaining attention while covering a complete workflow. If your tutorial runs longer, consider breaking it into a series of shorter videos, each covering one specific task.
What is the best screen recording software for tutorials?
It depends on your workflow. OBS Studio is free and powerful but has a learning curve. Camtasia offers all-in-one recording and editing for $300. Loom is great for quick, casual recordings. For a more AI-driven approach, ngram automates the editing side - turning raw screen recordings into polished tutorials with zoom, callouts, and captions.
Do I need expensive equipment to make tutorial videos?
No. The most important investment is a decent USB microphone ($50-$150). Your computer's built-in screen recording and a free tool like OBS Studio can handle the rest. You can always upgrade later as your content library grows.
How do I make a tutorial video by recording my screen?
Start by closing unnecessary apps and turning off notifications. Open your screen recording tool (OBS, Camtasia, Loom, or similar), select the recording area (full screen or specific window), enable audio input from your microphone, and hit record. Walk through the software workflow while narrating each step clearly. Record your audio as a separate track if your tool supports it - this makes editing much easier.
What makes a good tutorial video?
Five things: (1) a clear, single learning objective, (2) clean audio without background noise, (3) deliberate cursor movements with visual cues like zoom and callouts, (4) proper pacing that matches the complexity of the task, and (5) captions for accessibility. The best tutorials feel like a knowledgeable friend walking you through the process.
How much does it cost to produce a software tutorial video?
Costs range dramatically. A DIY screen recording with free tools costs essentially nothing. Using AI-powered editing tools runs $100-$500 per video. Professional editing services charge $1,500-$2,500, and full agency production can run $5,000-$16,000. According to Advids, the average 60-second software product video costs $2,990.
Ready to create your first software tutorial? Try ngram free and go from raw screen recording to polished tutorial in minutes - no editing experience required.